
How to Make Hokkaido Milk Bread
- Hannah Wright

- Jul 16, 2019
- 4 min read
I've been looking forward to sharing this post, because this has become one of the recipes I make the most often. There's nothing wrong with your average bread from the grocery store, it's normally pretty cheap and functions perfectly well for things you use bread for, but I've found that eating it by itself is not pleasant. I'm always putting peanut butter or some other topping on store-bought bread, but not the stuff I'm about to share.
Hokkaido milk bread is a type of bread that's very popular in places like China and Japan. The main difference between this recipe and others is that this type of bread uses what's called a tang zhong. Also known as a "water roux", a tang zhong is made with water and a couple of tablespoons of flour. When these two ingredients are mixed and heated, they thicken to a pudding-like consistency. Using this method combines some of the bread's starch with water, and this makes the bread last longer without using artificial ingredients! Even if this bread doesn't disappear quickly, when it dries out it will make great French toast. That will be another post 😉
To make Hokkaido milk bread, you will need:
For the tang zhong
6 tbsp. water
2 tbsp. flour
The rest of the bread:
1/4 cup half and half (You could use milk, but half and half is what my family always has on hand. Also, remember to use liquid measuring cups for liquids!)
1 1/2 tsp. active dry yeast
2 1/2 cups all purpose flour
3/4 tsp. salt
3 tbsp. sugar
1/4 half and half (milk or whipping cream will work, this is for something different than that first quarter cup).
2 eggs (one goes in the dough, and the other is for an egg wash.)
2 tbsp butter, softened.
Splash of milk or water for the egg wash
You'll start by making the tang zhong. Don't stress, its really easy. Combine the 6 tbsp of water and 2 tbsp of flour in a small pot and whisk to combine. Heat on low-medium heat, we don't want it to heat too fast or boil. Don't worry, I promise it will thicken. Make sure to stir so that nothing sticks and burns on the bottom of the pan. Keep an eye on it, it'll thicken quickly as it gets going.

When it's finished, set it aside to cool a bit. Now, you're going to wake up your yeast. Take that first 1/4 cup of milk/half and half/whatever you use and zap it in the microwave for 10-15 seconds. We don't want it too hot, it will kill the yeast. Stir together the liquid and the dry yeast and let it sit while you do the next step with the tang zhong.

It should have cooled a bit by now, so add one egg straight to the pot and stir until it's combined. Then, add the second 1/4 cup of liquid and stir to combine.

In a large bowl, add the flour, salt, and sugar and whisk together. Pour the tang zhong mixture into the bowl along with the yeast mixture. I mix by hand, but you could do this with a mixer as well. I mix until it's somewhat combined, then turn out my dough on a flat surface to knead until it's smooth. It's a great arm workout and a stress reliever, but it will take longer than using a stand mixer. But if you're bothering to make bread at home anyways, you must have planned at least an afternoon for it.


As you knead, the dough will come together. If it's too sticky you can add flour by the tablespoon, but it should feel elastic and supple, not dry. At this point, add 1 tablespoon of the softened butter and knead until it's incorporated. This gets messy doing it by hand, but I promise that the butter that gets all over your kneading surface will be incorporated. Just be patient! Do the same thing with the other tablespoon and leave the dough in a warm-ish place to rise for an hour.


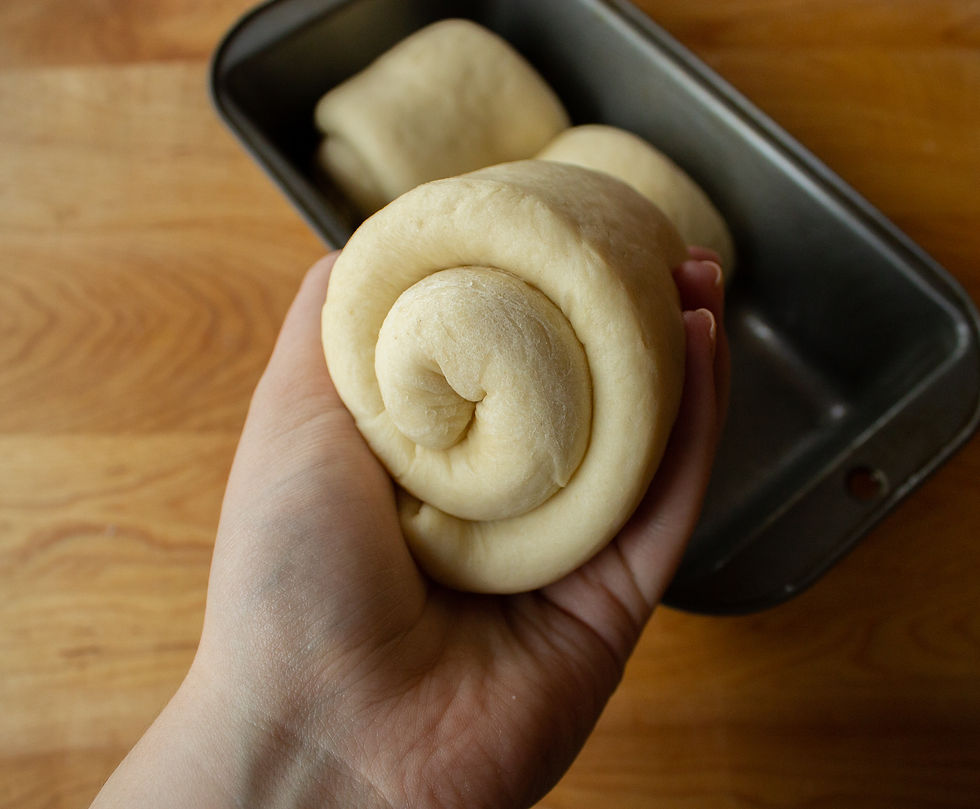
After an hour, deflate the dough a bit and turn it out onto a flat surface again. Divide it into 3 even-ish portions and roll them out to the approximate length and width of your baking pan. I use a 9x5 pan, and make sure to either use parchment paper or oil the pan very well. Fold the long sides in towards the middle, and then roll it up from the bottom, and place it into the baking pan with the end side down. Repeat for the other two portions and let the rolls rise for another hour. See, a lot of making bread is passive time!


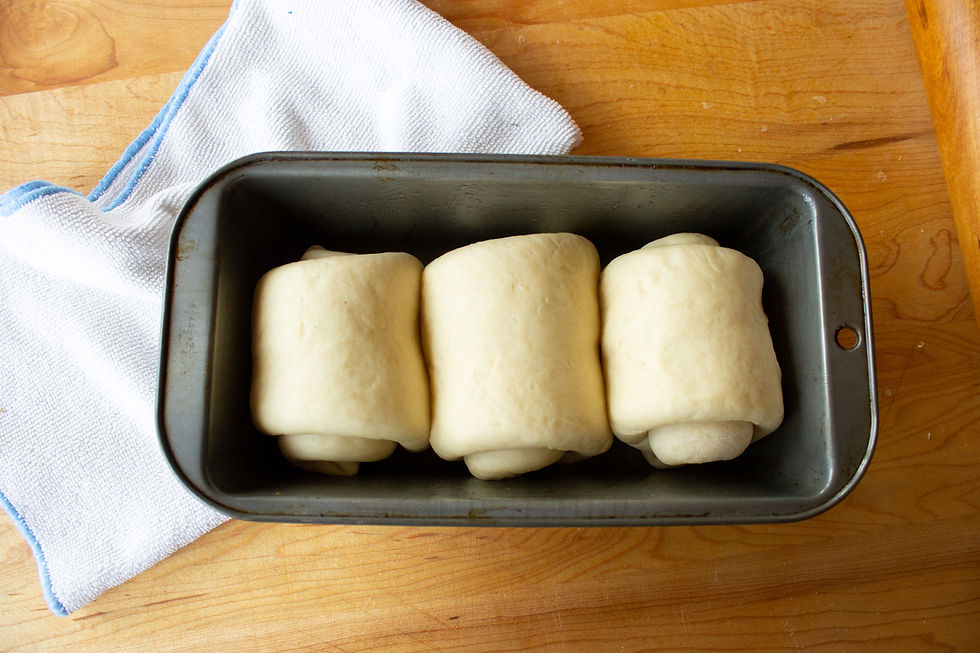
Towards the end of that second hour, I like to preheat the oven so it's ready when the hour is up. Set your oven to 350F and as it heats, make the egg wash. Crack the second egg into a small bowl, add a bit of milk or water, and beat. If you've got a brush of some sort, brush the mixture over the top of your bread rolls. Spooning it on could probably work too. The egg wash is what creates the beautiful, shiny, golden crust.
Bake for 30 minutes, then take it out and check the interior temperature. If it's at least 190F and nothing comes out on the thermometer after you pull it out, it's done! I like to let it cool in the pan for a bit, then take out the loaf and let it cool on a wire rack. If you can control yourself to let it cool completely, do so, but this bread is amazing when it's warm with a bit of butter on top!


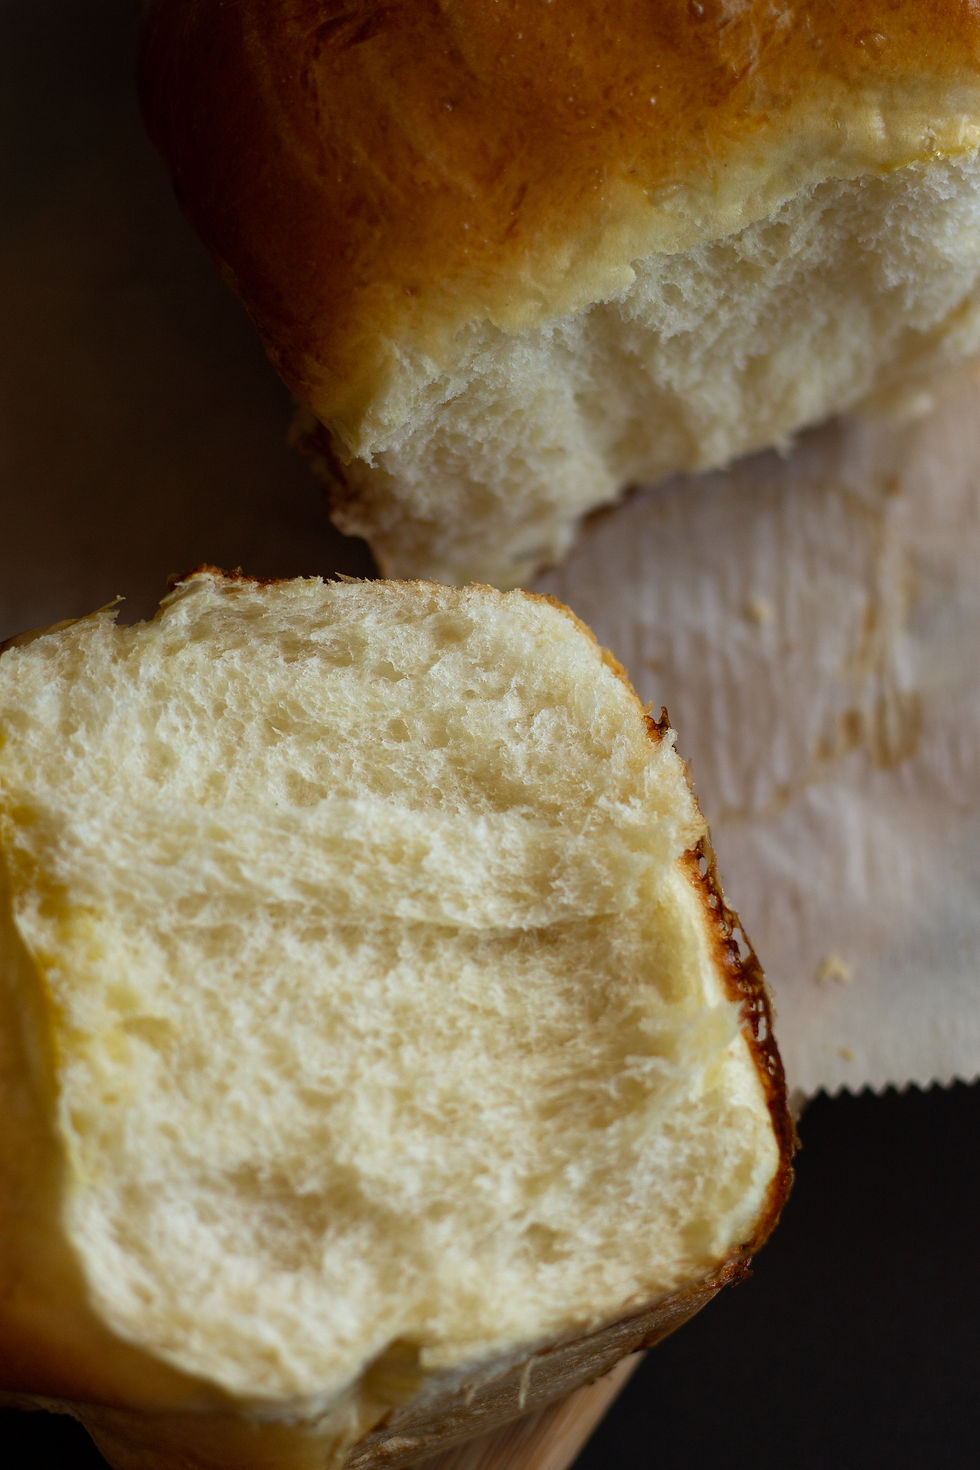
This bread is fluffy, a little sweet, and has a nice crust! It tastes so good by itself, but I like to top it with PB&J, toast it and top it with mashed avocado, make grilled cheese sandwiches, make French toast, or have it with eggs and bacon. The possibilities are endless!
I hope you enjoyed this post, and if you try making this bread, let me know! Thanks for reading!
xx, Hannah


Comments